Saturday 30 January 2010

First Grade Gunpla from 00 Gundam Series

Sorry guys, seems i'm keep posing my FG gundams haha.. after assemble this guys i feel self-fulfillment ;) Finally had finish all FG 00 Gundam. Check out the progress work follow by FG Gundam Exia, Virtue, Kyrios and Dynames.
"Octopus! Roll out!!" Oopss.. i mean Autobots :P Wait a minute.. This is Gundam, not transformer..
I think i need to clean my table.. Enjoy your weekend ;)

Thursday 28 January 2010

FG Gundam Exia - Part 5

This is the last part of FG Exia, just want to show before and after.


End of post.

Mr. Mark Setter and Mr. Mark Softer

Today i gonna show you guys the magic of Mr. Mark Setter and Mr. Mark Softer.

"Mr. Mark Setter setting solution is used on decals to help them stick better to the surface of your model.

Mr. Mark Softer setting solution is used on decals to help them conform to surface details. Basically, this solution "melts" the decals, allowing them to snuggle into every nook and cranny on your model's surface, essentially acting like paint!" -HLJ.

Well, honestly speaking i didn't see any different if you apply or not apply Mr. Mark Settle. But i did see Mr. Mark Softer make the decal "melt".
Let's begin, decal without applying Mr. Mark Softer. As you can see, there is some 'bubble' appear.

*i didn't add my blog address on these pictures, so you guys can have a clear look on it ;)
Decal with Mr. Mark Softer. *sigh.. my cacat painting skill.. all the mistake can see easily XD
One more sample.
The next day. The decal snuggle smoothly on the cranny part, nice right?

Tips from sbhboi:
Topcoat > Setter then decal then Softer > Topcoat. Won't tear or peeled after that =)

Saturday 23 January 2010

FG Gundam Exia - Part 4

This is my first time to applying water decal on gunpla kit, very nervous and exciting. haha..

Previously i was assemble the PG Model GD GAT-X105, i didn't use the water decal, so gonna try on this FG.
Mr Mark Setter and Softer it's very useful tools for water decal, it's a must have tools.

Some sample pictures after applying water decal.


Hhm... still feel emtpy, maybe i should add some more. Will post more details on the Mr. Mark Setter and Softer.

January Loots

Yahoo! finally Nendoroid Drossel.

And Mio!
And RX-0 Unicorn Head Display Base!!
As you can see, all my FG 00 Gundam series are finish painting, gonna try water decal on it ;)

Saturday 16 January 2010

FG Gundam Exia - Part 3

Hm.. i always headache evertime when i want to paint Grey color, don't know which color should i choose haha.. XF-63 German Grey or XF-24 Dark Grey. Actually the outcome is same.. Grey = =.. Well, will used XF-63.

After a hour pass.. my back really hurt.. need to take a short break.
Next, i gonna do some touch up on the parts, because of my careless XD As you can see, the grey paint is overstep the parts, using tooth pick to scrape the extra paint.
Here is an example, scraping the grey paint halfway.
Left leg before scrape, right leg after scrape. So.. continue scraping others parts XS this is the bad thing if you using hand painting. But, in other way, if anything go wrong, you still can scarpe it ;)
Aahhh... finally.. all clean ^ ^ but, some paint i over scrape, the paint removed T_T need to repaint again..
"Impressive. Most impressive. Obi-Wan has taught you well. You have controlled your fear. Now, release your anger. Only your hatred can destroy me." said Vader.

"What the..." Johnny
Ok, some sneak peak on FG Exia.

End of post.

Friday 15 January 2010

FG Gundam Exia - Part 2

I'm using Tamiya acrylic paint X-5 Green for the GN-Drive. At first i didn't know Tamiya paint have 2 type, Grossy and Flat surface. If you see on the lable "X" mean grossy surface type, "XF" mean flat surface type, eg. X-5 Green(grossy) and XF-3 Flat yellow(flat).

One thing i worry about, if after apply Flat top coat, all the grossy become flat... T_T it's time to use masking tap..
After applying X-5, looks cool right?
Next is XF-3 Flat yellow.
If you look closer, the yellow paint a bit 'come out' will do the touch up after it's dry.
Going to apply XF-7 Flat Red. Want to make all my 00 gundams to Trans-Am mode.
Actually i have make a big mistake.. When Trans-Am mode, all the GN things become Black not green.. haha... XS

Thursday 14 January 2010

Exia in love

Skyl, this is what i'm talking about.. haha..
I like this VF-25S with LED XD by JKL.
For more info about these above post, please click here.

FG Gundam Exia - Part 1

First, i don't really like Exia design.. (no offence to Exia fans, just my opinion.) For me, it's look like a lady type gundam.. long legs, slim body. If compare with 00 Gundam.. i still prefer Exia haha.. don't ask me why. Luckly Exia have GN-Drive and 7 Swords, it's feel like a "Assassin" for me, i would say a good side assassin ;)

Ok let's begin.


Using guitar pick to de-assemble all the parts.
Have a look again, if without painting.
The very first step, i usually paint the white color on the parts first.
Ok done. will put 2nd layer on tomorrow. End of post.

Wednesday 6 January 2010

Gift from Drinkin"s Boys

Yesterday just pick up from Drinkin"s Boys, please refer this post. Thanks Bro, i really like it =D

Next i gonna do some painting job, but first, i need to finish the FG Exia. Lately too busy on work, almost everyday OT sob sob..

Big Thanks to Drinkin"s Boys!

Sunday 3 January 2010

The Last Sunset of 2009

Today is a special day. After work, I picked up my girl friend then we headed towards Jerudong highway. We weren't sure which beach to go to but eventually we decided to go to Tungku beach.

Once we got there, we found out that we chose the wrong spot to see the sunset since the sun set on the other side. Perhaps Jerudong beach would have offered a better view.

Photo taken by Sony DSC-W55.

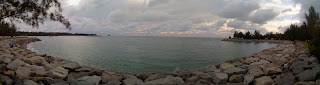
A landscape view. Taken by iPhone with photoshop editing.
Teach you guys some tips, how to make Panorama picture using your compact camera or mobile phone.

1. First you need to take 6 to 8 (or more) pictures from left to right, recommend to take portrait pictures(turn your camera vertical).

2. Open Photoshop CS3, Goto FILE > AUTOMATE > PHOTOMERGE.

3. Layout setting set Auto. Then press BROWSE, to choose the pictures.
eg. IMG_01.jpg, IMG_02.jpg, IMG_03.jpg, IMG_04.jpg, IMG_05.jpg, IMG_06.jpg

4. Then press OK. After the photo merge processing, you will have your panoramic picture.

Please note: Before merging, please resize your pictures to a lower resolution, as this will speed up the merging process.

Here is some of sample that i have make,
DEV Meet 5 - Click on the first and second picture to see the full size picture.
BRIDEX 2009 - Click on the last 2 picture, taken by Nokia N70.

Enjoy ;)